The Bealer project in Geneva started as a basement finishing job and became one of the more complete whole-home transformations we've done in the western suburbs. By the time we were finished, the family had a 14-foot custom wet bar, a stone fireplace lounge, a separated game room with acoustic treatment, and — added to scope midway through — a full two-tone kitchen refresh upstairs. Total project: $115,000. Permit pulled through the City of Geneva before demo. Every inspection passed on first attempt.
This post walks through exactly how the project came together, what decisions the homeowners made, what we found during construction, and what it cost. If you're considering a basement finish in Geneva, Batavia, St. Charles, or anywhere in Kane County, this is what the process looks like when it's done properly.
Starting Conditions
The Bealer home is a 1998 two-story on the east side of Geneva — well-built, good bones, and a fully unfinished basement with one significant advantage: existing rough plumbing installed by a previous owner who apparently intended to finish the space and never did.
That rough plumbing included a blocked-off drain in the position for a wet bar sink and a roughed-in drain and vent stack for a full bathroom that was never built. In basement finishing projects, concrete cutting to add new drains is one of the most expensive items on the budget — jackhammer crew, removal, new drain installation, concrete patching. The pre-existing rough-in saved the Bealers roughly $5,000–$6,500 compared to starting from scratch. When you're buying an older home with an unfinished basement, always check whether rough plumbing exists before assuming you need to start from zero.
Ceiling height measured 9'2" in the main area, dropping to 8'8" where the HVAC ductwork ran along one side. Both are workable for a finished basement — enough headroom to install a 7'6"–8' finished ceiling without the space feeling compressed.
Design and Scope Development
We sat down with the homeowners three times before finalizing scope. The first conversation was broad: finish the basement as an entertainment space with a bar and a comfortable seating area. Second meeting, after rough framing layouts: they wanted to carve out a separate game room for the kids — separated but visually connected to the main space. Third meeting, after we showed them the framing options and they could start to visualize the space: they wanted a fireplace.
The fireplace is always the "while you're here" addition. It never starts in the original budget. The framing phase is when homeowners most clearly picture what the space is going to feel like — the room starts to exist in three dimensions for the first time — and that's when they make their best and most expensive decisions. We're always supportive of this: better to scope the project correctly once than to come back in three years and wish you'd done it right the first time. We amended the permit (required when scope changes significantly), ordered the gas insert and ledgestone materials, and built the added three weeks into the revised schedule. The fireplace added $9,200 to the project. Worth it.
Final scope:
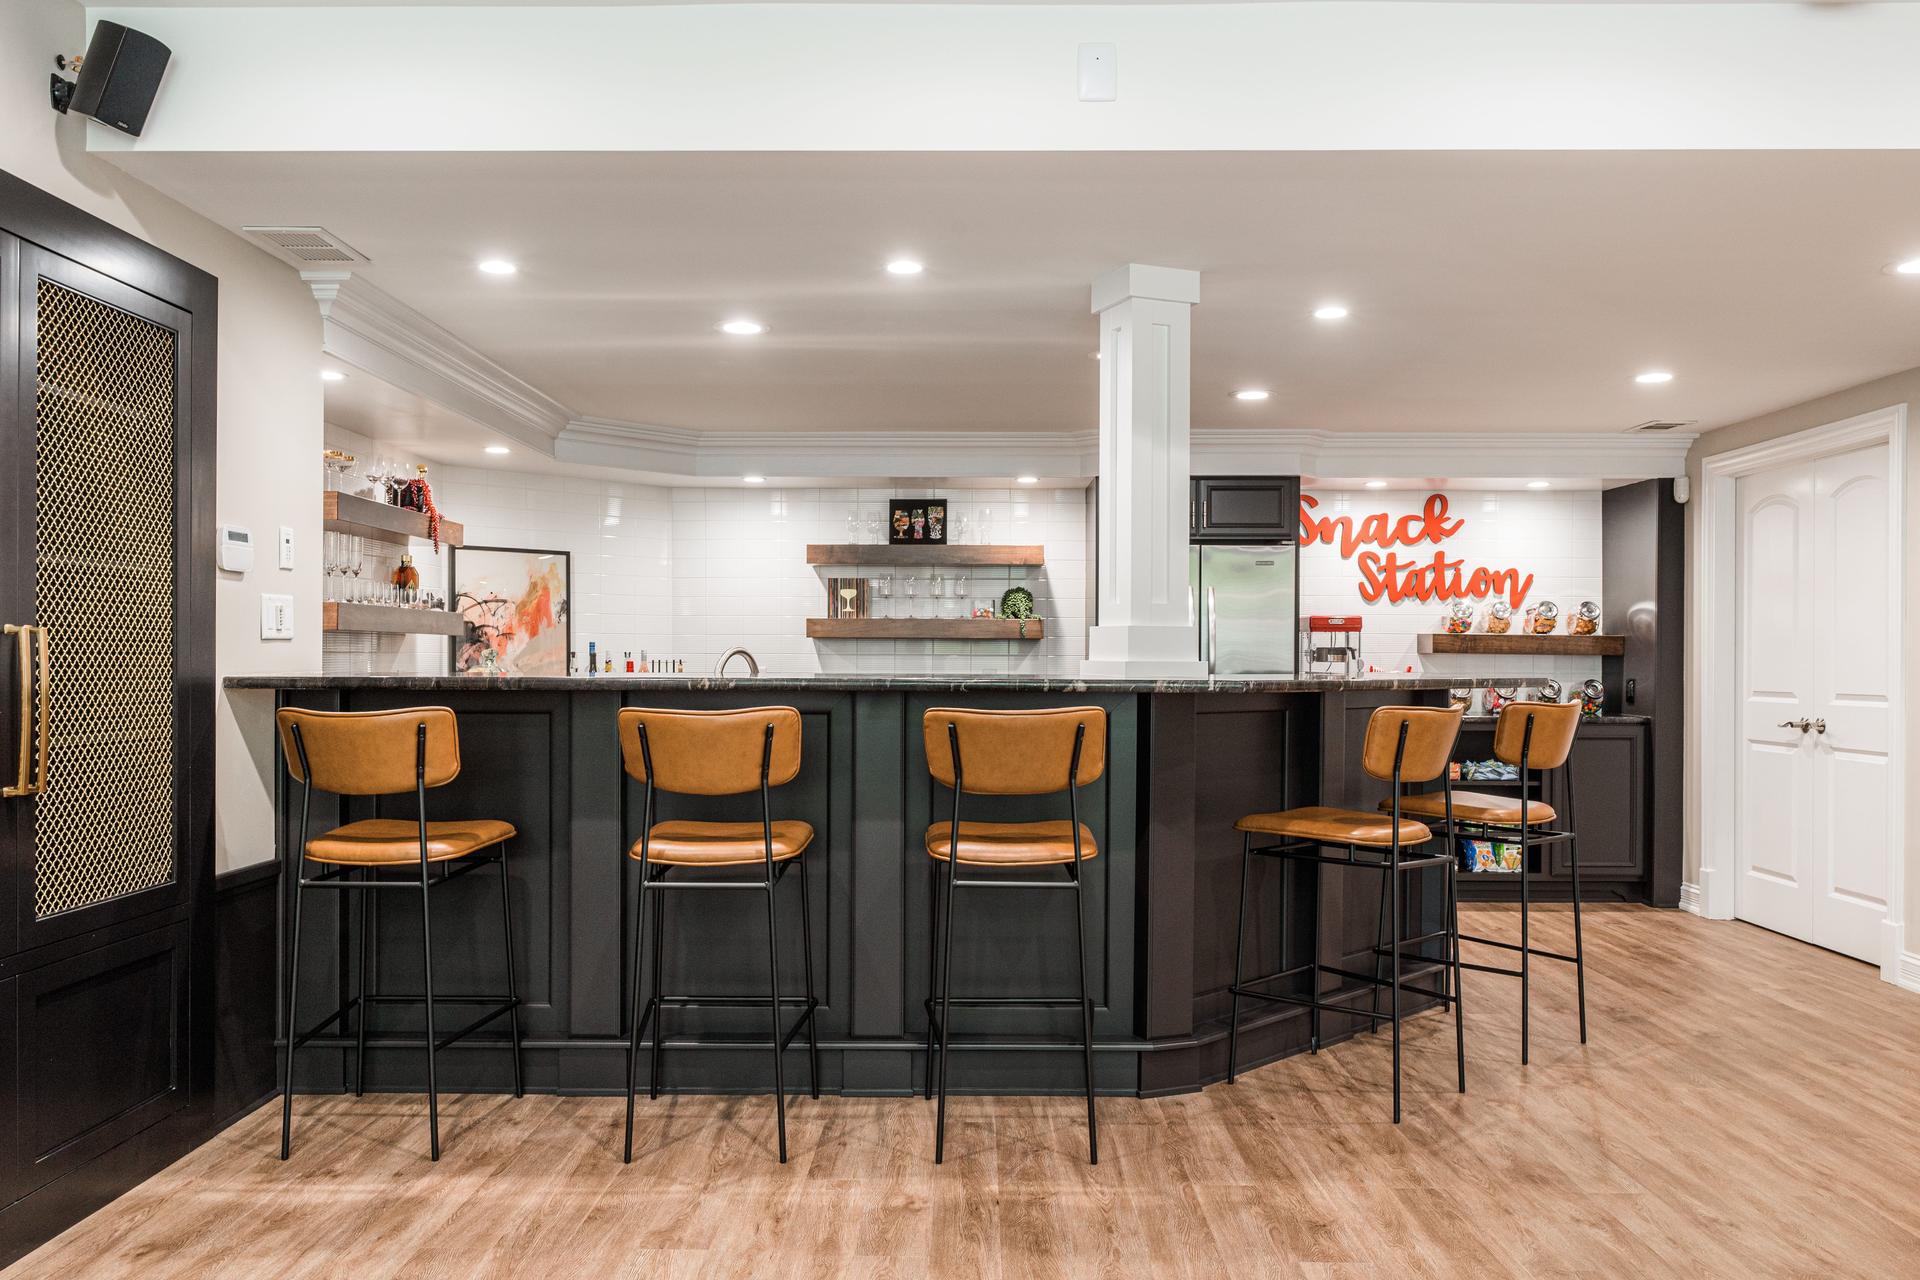
- 14-foot custom wet bar with upper and lower custom cabinetry, undermount sink, beverage refrigerator, keg tap setup, leathered granite counter, and floating display shelf with LED backlighting
- Main lounge: floor-to-ceiling ledgestone fireplace (gas insert), built-in shelving flanking the TV wall, LVP flooring throughout
- Game room (separated by a 42" half-wall with column detail to maintain sight lines): engineered hardwood, acoustic panel on the rear wall, dedicated circuit for projector and gaming setup
- Full bathroom using the existing rough-in: 36" shower with tile surround, floating vanity, tile floor
- Dedicated utility/mechanical room maintained with clean-access panel
The Permit and Inspection Process in Geneva
The City of Geneva processes residential building permits through City Hall at 109 James St. — phone (630) 232-0032. We submitted a complete set of plans (floor plan, framing details, electrical diagram, plumbing diagram, egress window specs) about four weeks before scheduled demo. Permit approved in 11 business days. Total permit fee for this scope: $680.
Inspection sequence for this project, in order:
- Framing: Passed. Inspector noted the egress window dimensions met the 5.7 sq ft net clear opening requirement and that the stair handrail blocking was correctly installed.
- Electrical rough: Passed. We installed a 60-amp subpanel for the basement (the main panel upstairs was already 200-amp but needed a dedicated feed to the basement for the additional circuits). AFCI breakers throughout per current NEC code. GFCI protection at all wet locations.
- Plumbing rough: Passed. The wet bar sink and bathroom fixtures connected to the existing rough-in drains. Drain slope verified at 1/4" per foot.
- Gas rough: Passed. We extended a gas line from the mechanical room to the fireplace location. Coordinated with a licensed gas technician for the line work and insert installation.
- Insulation: Geneva required a separate insulation inspection before drywall. Spray foam on rim joists, R-15 mineral wool batts on the concrete walls. Passed.
- Final building inspection: Passed. Certificate issued, on file with the City of Geneva.
Building the Bar
The bar was custom-built by our cabinet shop — not purchased off the shelf. The full 14-foot run has base cabinets with soft-close drawers and doors, upper cabinets for glassware storage, and open shelving above the refrigerator section sized to display bottles with undercabinet lighting behind. The counter is leathered granite — a finish that shows far less wear and fingerprinting than polished in a bar environment, and that reads as more intentional than the standard polished slabs.
The keg tap setup required a few specific plumbing details that aren't standard: a dedicated floor drain line for the drip tray, a glycol cooling loop under the counter connected to the keg refrigerator, and a CO2 supply line. The plumber handled the drain connection; we coordinated with a draft beer equipment specialist out of Naperville for the tap system itself.
The undercabinet LED strip lighting is tied to a Lutron smart dimmer — the same system the homeowners have throughout the rest of the house. When the overhead cans go down and the bar lighting comes up, the entire character of the space changes. This is a $400 lighting detail that produces disproportionate effect. We put it in every bar project we do.
The Fireplace
A fireplace in a basement lounge accomplishes two things architecturally: it creates a focal point that organizes the entire furniture arrangement and forces intentional layout rather than just dropping a couch in front of a TV wall, and it signals permanence — this is a room that was thought about, not just finished.
The ledgestone is real stone — thin-cut natural stone strips mortared over a cement board substrate we framed out from the wall to create dimensional depth. It's not faux stone panels; each piece is individually cut and set, which is why it looks the way it does. Our mason spent three full days on the surround. The Napoleon 36" direct-vent gas insert uses a coaxial vent pipe that runs up through the joist bay and exits through the wall — no masonry chimney required, which keeps the install clean and the structural impact minimal.
The Game Room Separation
The solution to the "separated but connected" design challenge: a 42" half-wall with a steel post-and-beam detail at the top, open above the wall to the full ceiling height. From the lounge you can see into the game room; from the game room you can hear what's happening in the main space. The wall creates a zone without creating a closed room.
The acoustic panel on the rear wall of the game room came up late in the project — one of the homeowners plays bass guitar and mentioned wanting the room to function as a practice space in addition to a gaming space. We sourced 2-inch fabric-wrapped acoustic panels and installed them on Z-clip mounting hardware, which makes them fully removable if the room's use changes down the road. Total material cost for the acoustic panels: $780. Installed in half a day.
The Kitchen Add-On
About six weeks into the basement project, the homeowners asked whether we could do a kitchen refresh upstairs while the trades were already on a rolling schedule. The timing made sense: the electrician was coming back for the basement final anyway, we had no mobilization overhead for a second small project, and the homeowners would have a functional wet bar downstairs during the kitchen disruption period.
Kitchen scope: full repaint of all cabinetry in two tones (white uppers, navy lowers), new quartz countertops throughout including the island, new subway tile backsplash, new undermount sink and faucet, new cabinet hardware, new pendant lights over the island. No structural work, no plumbing relocation. We pulled a minor permit for the pendant fixture wiring.
Cost: $28,000. Timeline: the cabinet repaint and countertop template happened during the basement finishing phase; the countertop install and backsplash happened in the final two weeks of the project. The homeowners were without their full kitchen for about 12 days.
Full Cost Breakdown
Total project: $115,000. Basement finishing scope: $87,000. Key line items:
- Custom cabinetry (wet bar): $14,200
- Electrical (subpanel, all circuits, recessed cans, smart switches, under-cabinet lighting): $9,400
- Stone fireplace surround and mantle: $8,400
- Framing and rough carpentry: $8,200
- Flooring (LVP in main area and lounge, engineered hardwood in game room, tile in bathroom): $7,300
- Drywall and finishing: $6,800
- Plumbing (wet bar sink, full bathroom): $4,800
- Painting and trim: $4,200
- Countertops (bar granite, bathroom vanity top): $4,100
- Gas line extension and Napoleon insert installation: $3,600
- Draft beer system (keg refrigerator, tap, glycol loop, CO2): $2,800
- Insulation (spray foam rim joists, batt walls): $2,900
- Acoustic panels: $1,100
- Permit fees: $680
Kitchen refresh: $28,000. If the rough plumbing hadn't been pre-existing, the project total would have been approximately $120,000–$121,000.
Realistic Ranges for Basement Finishing in Kane and DuPage County
The Bealer project is on the elaborate end of what we build. Most basement finishing projects in this market are simpler, and the process is the same regardless of scope. The variables that most affect price:
- Ceiling height: Lower ceilings (under 8') make HVAC routing more complicated and limit lighting flexibility. If you have 9'+ ceilings, that's a significant asset.
- Existing rough plumbing: Pre-existing rough-in for a bathroom and wet bar sink can save $4,000–$7,000 versus starting from scratch with concrete cutting.
- Egress windows: Older homes often lack the required egress windows in the basement. Adding them involves excavation, window well installation, and window selection — $1,500–$2,500 per window depending on depth and soil conditions.
- Finish level: Builder-grade materials throughout versus the level of finish in the Bealer project represents roughly a $20,000–$40,000 difference on the same square footage.
Practical ranges for the Geneva/Batavia/St. Charles/Naperville market in 2025: $38,000–$55,000 for a clean open-concept finish with one room, LVP flooring, a simple bar setup, and a basic bathroom. $55,000–$85,000 for a project with separated rooms, custom bar, quality finishes, and a full bath. Above $85,000 for a project at the Bealer level of finish — custom cabinetry, real stone, specialty systems.
We offer free estimates for basement finishing throughout Kane, DuPage, and Will County. Contact us online or call (630) 202-0689 to schedule a site visit.
Frequently Asked Questions
Do you need a permit to finish a basement in Geneva, IL?
Yes, in almost all cases. Any basement finishing that includes electrical, framing, egress modifications, or plumbing requires a permit through the City of Geneva Building Division. The permit protects the homeowner — inspections verify the work is done correctly, and the permit record transfers with the home when you sell. Unpermitted basement finishes are a common and expensive problem to deal with at closing.
How long does basement finishing take in Geneva?
A project of this scope (wet bar, fireplace lounge, game room, full bathroom) took 18 weeks from permit submission to final inspection certificate. A simpler open-concept finish with basic bar and bathroom would typically run 10–14 weeks. Timeline varies primarily based on permit turnaround, custom material lead times, and project complexity.
What ROI does a finished basement add in the Geneva area?
Finished basements in Kane County typically return 60–75% of cost at resale. On a $70,000 basement finishing project, that's $42,000–$52,500 in appraised value added. The ROI is strongest in the $450K–$700K home price band, where buyers expect finished space and will pay a premium for it. The Bealer homeowners are squarely in this range.
Can I add a bathroom to my existing basement?
Yes, and the cost depends heavily on whether rough plumbing already exists. If a prior owner roughed in a drain (common in homes built 1990–2005 where basements were finished in subsequent phases), the cost to build a bathroom is $8,000–$14,000. If you're starting from scratch, concrete cutting to connect to the existing sewer line adds $3,500–$6,500 to that number.
How much does it cost to finish a basement in the western suburbs of Chicago?
A standard basement finish in DuPage or Kane County — open layout with egress window, a bathroom, a bar area, and a bedroom — typically runs $55,000–$110,000 depending on size and finish level. Higher-end finishes with custom millwork, a full wet bar with stone countertops, home theater infrastructure, or wine cellar elements add cost. The Bealer basement with its custom wet bar, stone fireplace, and acoustic-treated media room came in at the higher end of this range, reflecting the finish quality the family wanted.
What's the ROI on a basement finish in Geneva or Naperville?
Finished basements in the western suburbs typically return 65–75% of cost at resale according to regional data. More importantly, a finished basement represents 800–1,400 square feet of usable space in markets where square footage costs $150–$250+ per foot above grade. For families who use the space daily — as a family room, home office, guest suite, or entertainment area — the quality-of-life return is significant regardless of resale math.
How long does a whole-home renovation take?
A project of Bealer's scope — significant kitchen renovation plus full basement finish plus multiple bathroom renovations — typically takes 16–28 weeks from permit approval to final walkthrough. The critical path runs through permit approval, material lead times, and structural work sequencing. We build detailed schedules at project kickoff and track against them weekly. Timeline overruns on large projects are usually material delays or change orders, not labor issues.
How do you manage living in a home during a major renovation?
The Bealer family stayed in the home throughout the project. Key practices that make this workable: clear staging of work by zone (finish the basement before starting the kitchen), daily site cleanup, plastic barriers between active work zones and living spaces, and realistic communication about which areas will be disrupted on which days. We've completed multiple whole-home projects with families in residence — it requires more coordination than an empty-home renovation but it's entirely manageable.